
You finally capture the perfect shot. The light glows, the pose works, and everyone looks happy. Then you zoom in and spot a stranger walking right behind your subject.
Until recently, the fixes were clumsy. Cropping cut away half the scene, while manual cloning took patience and practice. Fortunately, AI now handles most of that work for you.
In fact, a good AI remover erases the person and rebuilds the background behind them. As a bonus, removing strangers also protects their privacy when you post photos online.
This hands-on guide shows you how to erase photobombers from your favorite photos. Below, you’ll learn how the technology works and which tools deserve a try. After that, a five-step walkthrough takes you from upload to export.
How AI Removes People From Photos
Most AI removers follow the same basic process. First, you mark the person with a brush, a lasso, or a smart selection. Next, the AI deletes those pixels and studies everything around the gap.
It reads the textures, lines, colors, and lighting nearby. Then it paints in new pixels that continue those patterns. Developers call this step inpainting, and it usually takes only seconds.
That’s a big leap from older methods. Cropping removes the problem, but it can also ruin your composition. In addition, manual cloning takes time and often leaves obvious repeating patches.
So where does AI removal help most? Travel photos lose the tourist who wandered into your landmark shot. Likewise, family shots drop stray passersby, and product images shed distracting background staff.
Of course, AI removal isn’t magic. It shines on open backgrounds such as sky, sand, grass, roads, and plain walls. However, tiles, railings, text, and reflections often need a second pass or a touch-up. The toughest case is a stranger who overlaps your subject, because the AI must guess what’s hidden.
Recommended Tools for Erasing Photobombers
Clean edits don’t require pricey software or advanced skills. Instead, a few focused tools handle nearly every case.
- A dedicated AI person remover. This is where most of the work happens. For instance, CapCut’s online tool lets you easily remove person from photo, then rebuilds the background. You mark the person, along with hair, bags, and shadows, using a brush, lasso, or smart selection. It can also handle several people, either together or one at a time.
- Your phone’s built-in editor. Many gallery apps now include a basic object eraser. It’s handy for small, simple distractions when you’re on the go. However, it may struggle with large figures or busy scenes.
- A crop and straighten tool. Sometimes a tighter frame solves the problem faster than any AI.
- Basic adjustment sliders. A touch of grain or sharpening helps the rebuilt area match the rest of the image.
Before you upload personal or client photos, review the tool’s privacy terms. For a closer look at how this kind of cleanup works, see this guide to AI object removal. Also, check any limits on image size, export quality, or daily use.
Hands-On Walkthrough: Remove a Person From a Photo in Five Steps
Open a photo with one unwanted stranger and work through these steps. They suit travel shots, family snaps, and product images alike. Your first edit may take ten minutes, but later ones go much faster.
Step 1: Start With the Best Version of Your Photo
Always work from the original file, not a screenshot or a compressed social media copy. More pixels give the AI more detail to rebuild from.
Next, study where the photobomber sits in the frame. A stranger at the edge is easy, whereas someone overlapping your subject needs extra care. Also, note anything the person blocks, like a sign or a railing. The AI has to invent whatever sat behind them.
Step 2: Upload the Image and Mark the Photobomber
Upload the photo to your remover and choose a selection tool. If smart selection is available, let it trace the outline first. Then paint over anything it missed, including hair, bags, and loose clothing.
Don’t forget their shadow on the ground or a reflection in nearby glass. Otherwise, the AI removes the body but leaves a ghostly trace behind. Before you apply anything, review the mask once more.
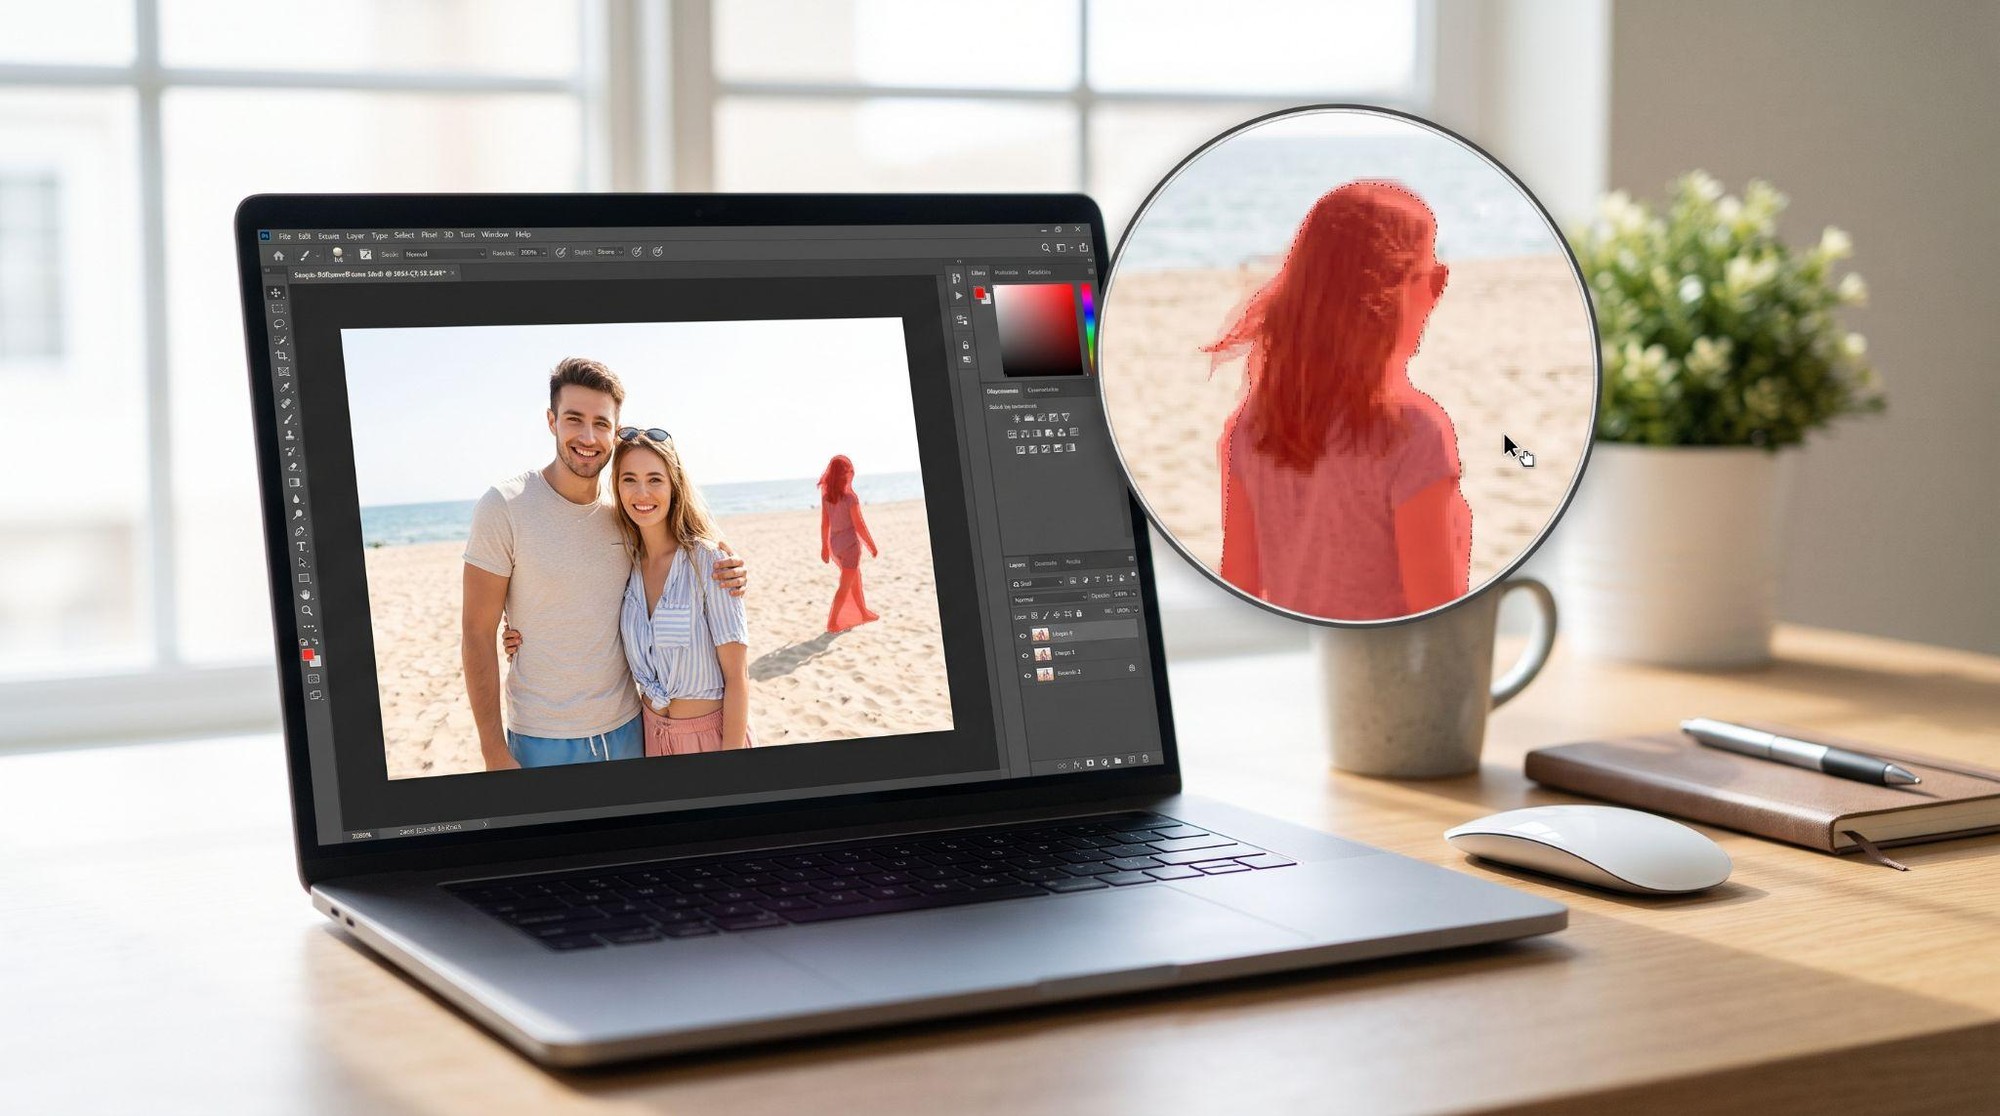
Step 3: Apply the Removal and Compare Versions
Run the removal and give the AI a moment to rebuild the scene. The gap fills with matching textures, such as sky, grass, walls, or pavement.
If the first result looks odd, run it again. Each attempt can differ slightly, so a second try may produce a cleaner fill. Compare the versions side by side, and keep the most natural one. With several strangers, remove them one at a time and check each result.
Step 4: Zoom In and Inspect Every Edge
Now zoom to 100 percent or more and scan the edited area slowly. Look for smudges, blurry patches, and textures that repeat too neatly.
Pay close attention to straight lines, such as horizons, railings, and floor tiles. These often bend or break where the person once stood. Also, scan the edges for leftover feet, fingers, or bits of shadow.
Finally, zoom back out and view the whole image. A fill can look fine up close yet feel wrong at normal size. In that case, nudge the brightness or warmth until the patch disappears.
Step 5: Refine, Polish, and Export
Fix small flaws with a second, tighter pass over just that spot. A stray shadow or a soft edge usually disappears on the next try.
Afterward, add a touch of grain or sharpening so the patch blends in. Save the result as a high-quality JPEG or PNG to avoid fresh compression artifacts. Lastly, keep your original file for comparison.
Tips for Clean, Natural-Looking Results
A few small habits make a big difference in the final image.
- Include shadows and reflections. A missing person with a visible shadow looks stranger than the original photobomb.
- Brush slightly past the edges. A generous selection leaves no stray hair or outline behind.
- Fix the biggest distraction first. Often, removing one obvious stranger is enough to rescue the shot.
- Protect what you love. Keep the brush away from your subject’s hair, hands, and clothing.
- Leave distant crowds alone. Removing every far-off figure can make a busy street look eerily empty.
- Know when to crop. If a stranger covers half your subject, a tighter frame may look better.
- Remove first, crop later. Extra background gives the AI more patterns to copy, so save cropping for the end.
- Edit on a large screen. A laptop or tablet makes precise brushing much easier than a tiny phone.
Common Mistakes That Leave Obvious Traces
Even the smartest remover can’t save a rushed edit. Watch for these frequent slip-ups.
- Using a low-quality copy. Compressed images give the AI less detail, so the fill looks muddy.
- Removing too much at once. Huge selections force the AI to invent large areas, which rarely looks real.
- Ignoring background lines. A warped railing or broken horizon tells viewers that someone edited the photo.
- Over-editing the scene. Stacking fix after fix can turn the background into a plastic-looking blur.
- Skipping the zoom check. Flaws that hide on a phone screen often jump out in a large print.
Final Thoughts on Erasing Photobombers
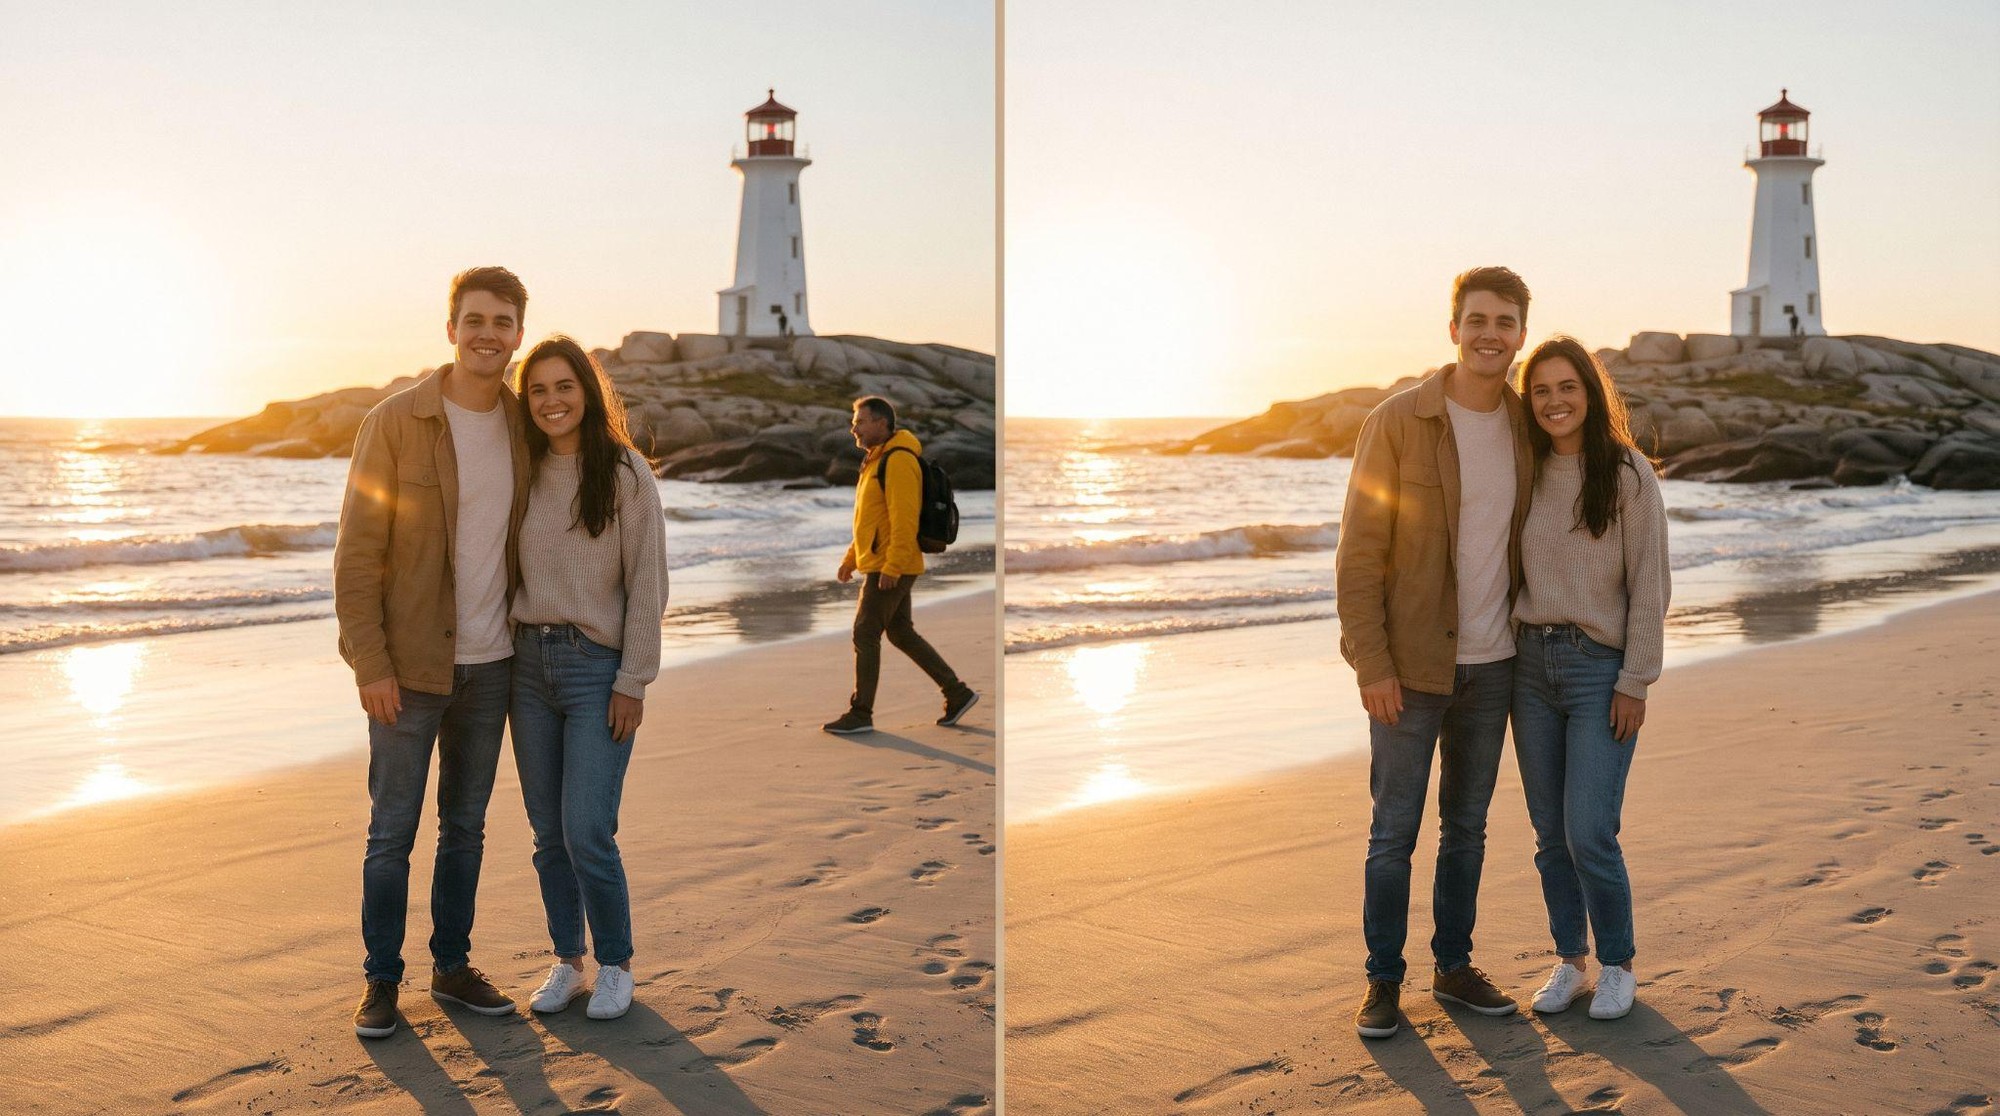
Photobombers no longer have to ruin your favorite memories. Moreover, the fix now takes minutes instead of an evening of fiddly cloning. With a clean source, a careful selection, and a final zoom check, AI handles the rest. Treat it as a helper, though, and let your own eye have the last word.
So start with one easy photo, such as a beach shot with a lone stranger. Then move on to busier scenes as your eye sharpens. Before long, those nearly ruined shots will be back on your walls and feeds.

